Lately I was asked to analyze a "Back-end as a Service Tool" called Apache Usergrid (I will call it AU now). Well, first of all it runs on Linux OS (as a Microsoft guy, this was not very promising) with a Cassandra database (NoSQL) as back-end. AU is web based and runs in a Tomcat. For more information about AU, please visit http://usergrid.apache.org/.
AU requires technologies with which I have never worked so far. I spent a lot of time creating a clean installation procedure for myself so I decided to share my knowledge.
Azure VM
For the setup I chose the image “Ubuntu Server 14.04 LTS” running on an "A3" machine (4 Cores, 7 GB RAM).
Authentication type was set to “Password”.
The IP was set to Fix.
Add the "Tomcat" End point:
Public Port: 8080
Private port: 8080
Java
First of all, we need to install Java 8. (Call each line individually)
sudo add-apt-repository ppa:webupd8team/java
sudo apt-get update
sudo apt-get install oracle-java8-installer
Accept the license agreement and continue installation.
Make sure the Java 1.8 installed:
java -version
-> has to 1.8
Now we need to add Java Home to the environment variables.
sudo nano /etc/environment
Add the following line at the end of the file
JAVA_HOME="/usr/lib/jvm/java-8-oracle"
 Ctrl+X to exit and Y to save file.
Load the file source /etc/environment
Test: echo $JAVA_HOME
The result should be "/usr/lib/jvm/java-8-oracle"
Tomcat
Next up, lets install Tomcat:
sudo apt-get install tomcat7
 Uups, something went wrong. We need to set the JAVA home path:
sudo nano /etc/default/tomcat7
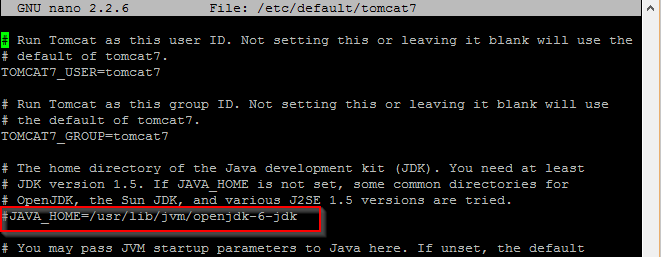 uncomment line the #JAVA_HOME and set to "/usr/lib/jvm/java-8-oracle".
 Restart the Tomcat
sudo service tomcat7 restart

Open a browser and navigate to http://xxx.cloudapp.net:8080. The result should look similar to this:

Cassandra (from http://wiki.apache.org/cassandra/DebianPackaging)
AU requires Cassandra 1.2 to be installed.
To do so, some additional steps need to be made:
sudo nano /etc/apt/sources.list
At the end, add the following 2 lines:
deb http://www.apache.org/dist/cassandra/debian 12x main
deb-src http://www.apache.org/dist/cassandra/debian 12x main
 Now we need to trust the new sources. (Call each line individually)
gpg --keyserver pgp.mit.edu --recv-keys F758CE318D77295D
gpg --export --armor F758CE318D77295D | sudo apt-key add -

gpg --keyserver pgp.mit.edu --recv-keys 2B5C1B00
gpg --export --armor 2B5C1B00 | sudo apt-key add -

gpg --keyserver pgp.mit.edu --recv-keys 0353B12C
gpg --export --armor 0353B12C | sudo apt-key add -
Now we are ready to install Cassandra:
sudo apt-get update
sudo apt-get install cassandra
Maven(from http://www.mkyong.com/maven/how-to-install-maven-in-ubuntu/)
AU needs to be compiled on the machine. For this purpose we will install Maven.
sudo apt-get install maven
The version should be above 3.0
mvn -version
Apache Usergrid (partly from http://usergrid.apache.org/docs/installation/ug2-deploy-to-tomcat.html and many thanks to Jeffrey West)
Finally Apache Usergrid can be installed. First of, we need to get the version 1.x from Git:
sudo apt-get install git git-core
git clone -b 1.x https://github.com/apache/usergrid.git
Update the configuration file and change the default username and password.
nano usergrid/stack/config/src/main/resources/usergrid-default.properties
It is very important to set login.allowed to "true"
Press Ctrl+W and search for Admin. Update the default username and password.

Let's build the stack (Call each line individually)
cd
cd usergrid/stack
sudo mvn clean install -DskipTests
During the build process a new file called ROOT.war was created. This file needs to be deployed in the root folder of Tomcat. The following lines will delete the current ROOT folder and copy the ROOT.war to the Tomcat server. By restarting Tomcat, the .war file is deployed. (Call each line individually)
cd
sudo rm -R /var/lib/tomcat7/webapps/ROOT
sudo cp usergrid/stack/rest/target/ROOT.war /var/lib/tomcat7/webapps/ROOT.war
sudo service tomcat7 restart
Now let's setup the database and user. Open a new browser and call the urls ONE BY ONE. (These commands take some time to complete).
http://xxxxxx.cloudapp.net:8080/system/database/setup (where xxxxxx is the servername)
http://xxxxxx.cloudapp.net:8080/system/superuser/setup (where xxxxxx is the servername)
You should get a status OK.

Apache Usergrid Portal
The admin portal really helps you configuring and working with AU. Follow these steps to compile and deploy the admin portal.
First we need to get a few sources:
sudo apt-get install nodejs-legacy
sudo apt-get install npm
sudo apt-get install phantomjs
Let's compile the portal (this takes some time).
cd usergrid/portal
sudo ./build.sh -dev
Let's deploy the admin portal. Basically we copy the .jar file to the Tomcat server, extract the .jar file and copy the content into the new portal folder. (Call each line individually)
cd

sudo cp usergrid/portal/dist/usergrid-portal.tar /var/lib/tomcat7/webapps/usergrid-portal.tar

cd /var/lib/tomcat7/webapps
sudo tar -xvf usergrid-portal.tar
sudo mkdir portal
sudo mv usergrid-portal.2.0.17/* portal
sudo rm -R usergrid-portal.2.0.17
Additonnal configurations
After having deployed the admin portal, some additional configurations need to be done. Please execute the following commands from the Tomcat webapps directory:
cd portal
sudo nano config.js
Update the usergrid.overrideUrl from localhost to the Azure servername:
 where xxxxx is the DNS server name.
Restart Tomcat sudo service tomcat7 restart
Open the your browser at the following URL: http://xxxxxxxx.cloudapp.net:8080/portal
This kept me busy for 20 hours